Washed Out "Feel It All Around" Breakdown
As you may have already realized, we are obsessed with everything related to the 80s, be it their sound or their aesthetics, and for this reason, it is obvious that much of our day we are listening to Chillwave. However, the genre began to be known in the mid-2000s, and it is largely based on sampling 80s music and slowing down its tempo and pitch. So it is in the case of the Washed Out song "Feel It All Around" they sample Gary Low's song "I Want You" and decrease the tempo from 122 BPM to 86 BPM and drop six semitones to the track, but instead of doing that, we remake the song from scratch without any sample, so let's give it a listen.
- Every sound in this breakdown comes from our Chillwave Serum Pack. You can now recreate the full track instantly
- 🎧 Grab it now and get 20% off with code VW01
- Want to learn more? Check out our Courses
RELATED BREAKDOWNS
- Future Islands "Seasons" Breakdown
Like many of the songs of this style the bass is the driving force of the song and it turns out that in this case, it is too, so to do this patch we used 2 basic shapes, in the OSC A we put the wavetable position at 2 and bend it at -70%, in OSC B its wavetable position its set at position 4 making it a square wave and the sub-oscillator has a sine wave, envelope 1 is modulating the cutoff of the filter with a decay of 650 ms and that's it.

Something tells us that the chords are made with a digital synthesizer but it couldn't have been the famous DX7 since it came out in 1983 and Gary Low's song came out in 1982, so it must have been the Yamaha GS-1 or the Fairlight CMI and why I'm telling you this you may ask, its because these chords were a little tricky so we used a little production tip called layering, in which to create one specific sound you use several layers of the same harmony or melody, and these layers are made with the Serum digital wavetables instead of the analog ones, but enough of the lecture, let's hear the layer one.
Our first layer has a saw wave in OSC A but it has a sync window around 1.5% and OSC B has a Prime wavetable, this preset characteristic sound comes from its Cmb L6- filter which its resonance and mix knob are being modulated by 2 LFOs, also the finetuning on both oscillators is being modulated.

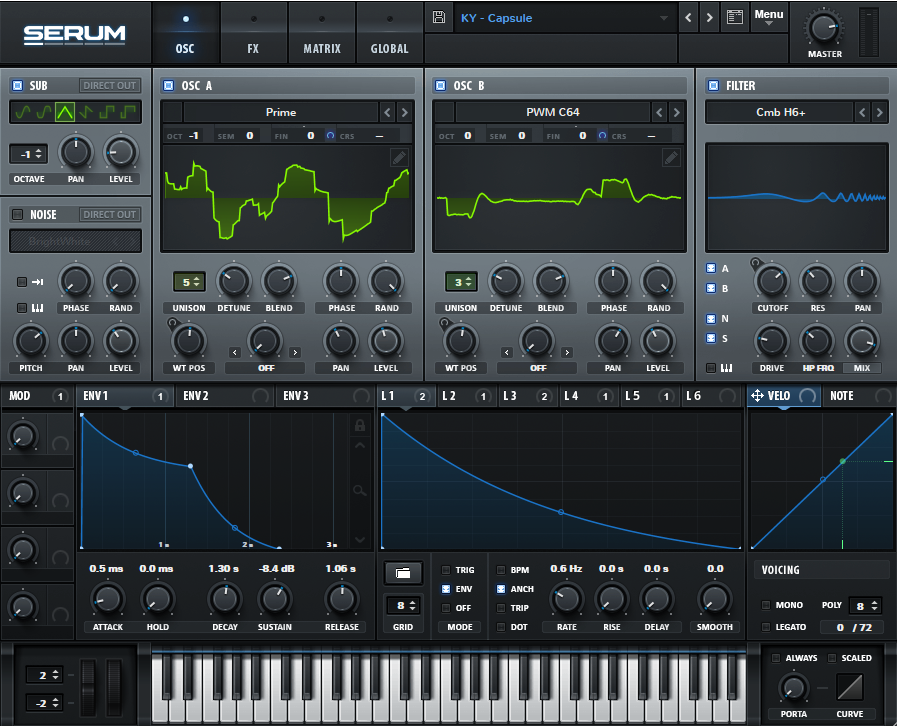
For layer two we used a Prime wavetable for OSC A and modulated the wavetable positions with an LFO, for OSC B we choose a PWM C64 wavetable and also modulated the wavetable positions with an LFO, they are being routed to the filter which is a Cmb H6+ the cutoff is being modulated by envelope 1.
For the sound design of this arp we also use 2 layers to achieve the sound we wanted, the first layer is the most predominant and the second layer is several decibels lower than the first but it gives a touch of sparkle in the high end.
This preset it's quite simple, in OSC A we use a saw wave with Fm modulation from the oscillator b, in OSC B we have a basic shape wavetable in its second position with a bend+ at 100%, the important part of this plucky sounds it's in the envelopes, the decay needs to be short, so in this case, it's around 415 ms but the release is longer at 1.55 s making the sound to last longer with a big shimmering delay.

The second layer it's also very straightforward, OSC A has a basic mini waveform in its third position and OSC B it's a basic shape waveform in its third position as well, what gives this preset its characteristic sound its the ring modulation filter making it sound more vibrant and airy.

Did you know that you can use Serum as a sampler, if you didn't know you are about to find out, so we wanted to create every part of this breakdown in Serum but when we got to the part of recreating the guitar we found a wall and there was only one way to break it and that was to record a sustained note in our Telecaster and sample it in Serum and that's what we did.
First, we grabbed our Telecaster one-shot (remember it must be in the tune of C) and drag it to the wavetable window, once in there we choose the constant framesize option, now we have to automate the wavetable position, we did it with LFO 1, after that we use the stock amp of Ableton to give it a little distortion and that's it.

If you liked this breakdown you should check our breakdown of the track "Resonance" by Home.